


Showing posts with label tutorial. Show all posts
Showing posts with label tutorial. Show all posts


Piecing Curves
Friday, September 21, 2012
There are lots of different ways to do the same thing when it comes to quilting. I'm going to show you how I pieced the curved blocks for the drunkard’s path quilt top in my previous post. Many of you mentioned in the comments that you had a special foot to help with curves. I have a Curve Master foot too, I just couldn’t find it. I know I tucked it away somewhere safe when we moved. I’m pretty sure I’ll find it someday when I open a random container. I need to practice more with that foot but like I said I couldn’t find it. So I started piecing these blocks the traditional way:
1. Fold your pieces in half and finger press the center (just the edge where the pieces will meet, no need to press down the whole length.)

2. You could also mark it with a pen, this will be in the seam allowance so it won’t show in the finished block

3. Place the two pieces right sides together and pin. Start by placing a pin in the center first. Then pin the outer edges. Don’t worry about the wonky-ness of the fabrics, just focus on pinning those edges nice and straight and making sure the ends meet all the way at the edge.

4. Now gently stretch and pin the fabrics between pins 1 and 2 making sure that the background fabric (white) comes up to the edge of the main fabric (pink.) repeat for the section between pins 1 and 3. Once you are done pinning you can take the block to your machine and start stitching. Stitch slowly and pull out the pins as you get to them.

As you can see you end up using a lot of pins to keep everything in place. It also takes a bit of time to get each block pinned up. You can only pin a handful of blocks before you run out of pins. I can’t even tell you the number of times I got poked when I reached for the next block. After doing this for a couple of blocks I thought that there might be an easier way. I HATE pinning. One or two pins is not that pad, but 7 pins per block is a bit much!
So I came up with a slightly different way of doing this that only requires 3 pins per block. You will need pins and a pair of bent tip tweezers for this method (mine came with the curve master foot but you can get them at a medical supply store, or on amazon)
1. Proceed through step 3 as outlined above.

2. I went ahead and pinned a whole stack of blocks until I ran out of pins.

3. Then I went to my machine. Just get the needle 1-2 stitches into the block to get started. Stop with the needle down to hold the block in place and remove the first pin.

4. Place your thumb at the middle pin and use your thumb to lightly pull the fabric away from the needle. You just need to pull until the fabric is taught and no longer buckled along the edges.

5. Now take your tweezers 1-2” above your pin and pull the background fabric (white) until it lines up with the main fabric (blue.) (While keeping your thumb in place. It’s hard to take pictures one handed!)

6. Use your index finger to hold the fabrics in place.

7. Repeat steps 5 & 6 a little closer to the needle. Use your middle finger to hold the fabric in place. You really don’t need a lot of pressure to hold the fabric in place. Do what is comfortable for your hand. Your hands shouldn’t be cramping up at all, if they are you’re trying to hard! Relax :)

8. If you need to (sometimes I did and others I didn’t) use your tweezers to pull that last little bit of fabric, in front of the presser foot, over into place as you start sewing.

9. Now you just move your fingers out of the way as you sew. Sew all the way to the middle pin, remove the pin and repeat steps 4-8 for the other half of the block.

This may seem like a lot of steps but it really does go pretty quick. It’s just a lot of steps to explain it. There is no stopping to remove pins every 10 stitches! Once I got the hang of it, it really only took 3-5 seconds to get my fingers in place. It was taking me at least 30-60 seconds to pin an entire block the traditional way. Not to mention all the pin pricks I was getting. One thing that I have found in quilting is that not everything works for everyone, but it doesn’t hurt to try it out. The blocks I was piecing where large 6.5” blocks with a gentle curve. I’m not sure how well this method will work for tighter, smaller curves. Let me know how it works out for you.
~ Norma
1. Fold your pieces in half and finger press the center (just the edge where the pieces will meet, no need to press down the whole length.)
2. You could also mark it with a pen, this will be in the seam allowance so it won’t show in the finished block
3. Place the two pieces right sides together and pin. Start by placing a pin in the center first. Then pin the outer edges. Don’t worry about the wonky-ness of the fabrics, just focus on pinning those edges nice and straight and making sure the ends meet all the way at the edge.
4. Now gently stretch and pin the fabrics between pins 1 and 2 making sure that the background fabric (white) comes up to the edge of the main fabric (pink.) repeat for the section between pins 1 and 3. Once you are done pinning you can take the block to your machine and start stitching. Stitch slowly and pull out the pins as you get to them.
As you can see you end up using a lot of pins to keep everything in place. It also takes a bit of time to get each block pinned up. You can only pin a handful of blocks before you run out of pins. I can’t even tell you the number of times I got poked when I reached for the next block. After doing this for a couple of blocks I thought that there might be an easier way. I HATE pinning. One or two pins is not that pad, but 7 pins per block is a bit much!
So I came up with a slightly different way of doing this that only requires 3 pins per block. You will need pins and a pair of bent tip tweezers for this method (mine came with the curve master foot but you can get them at a medical supply store, or on amazon)
1. Proceed through step 3 as outlined above.
2. I went ahead and pinned a whole stack of blocks until I ran out of pins.
3. Then I went to my machine. Just get the needle 1-2 stitches into the block to get started. Stop with the needle down to hold the block in place and remove the first pin.
4. Place your thumb at the middle pin and use your thumb to lightly pull the fabric away from the needle. You just need to pull until the fabric is taught and no longer buckled along the edges.
5. Now take your tweezers 1-2” above your pin and pull the background fabric (white) until it lines up with the main fabric (blue.) (While keeping your thumb in place. It’s hard to take pictures one handed!)
6. Use your index finger to hold the fabrics in place.
7. Repeat steps 5 & 6 a little closer to the needle. Use your middle finger to hold the fabric in place. You really don’t need a lot of pressure to hold the fabric in place. Do what is comfortable for your hand. Your hands shouldn’t be cramping up at all, if they are you’re trying to hard! Relax :)
8. If you need to (sometimes I did and others I didn’t) use your tweezers to pull that last little bit of fabric, in front of the presser foot, over into place as you start sewing.
9. Now you just move your fingers out of the way as you sew. Sew all the way to the middle pin, remove the pin and repeat steps 4-8 for the other half of the block.
This may seem like a lot of steps but it really does go pretty quick. It’s just a lot of steps to explain it. There is no stopping to remove pins every 10 stitches! Once I got the hang of it, it really only took 3-5 seconds to get my fingers in place. It was taking me at least 30-60 seconds to pin an entire block the traditional way. Not to mention all the pin pricks I was getting. One thing that I have found in quilting is that not everything works for everyone, but it doesn’t hurt to try it out. The blocks I was piecing where large 6.5” blocks with a gentle curve. I’m not sure how well this method will work for tighter, smaller curves. Let me know how it works out for you.
~ Norma
Double Duty (An Accuquilt Go! Tutorial)
Saturday, April 16, 2011
I've had my Accuquilt Go! for several months now. I was lucky enough to win a blog giveaway that included the Go! as well as 3 dies of my choice. (See my review of the Go! here.) Well this was a very tough decision since there are over 50 dies to choose from! I ended up choosing 2 strip dies and the Double Wedding Ring die. This may sound completely selfish but I mainly picked my dies according to price. There is just no way that I can afford to pay $80 per die. So I choose the more expensive ones that I wanted knowing that it would be easier for me to spend $30-$40 once in a while on some of the smaller dies.
I was really torn between picking the Double Wedding Ring die ($89) and the Rob Peter to Pay Paul die ($89.) In the end the Wedding Ring die won out because I really love that design and I know that some day I want to make a Double Wedding ring quilt and I can't imagine hand cutting all of those tiny pieces. As I was looking at the 2 dies side by side on my computer I had a wild and crazy idea that I could use the double Wedding Ring die to re-create the Rob Peter design!
Even though I recently received the Rob Peter die from Accuquilt I still wanted to test out my theory. So last night I pulled out my Wedding Ring Die and put my theory to the test.
 1. Cut one center section
 2. Cut 4 of the arc pieces
3. Sew the arc pieces to the center section
 Here I was trying out a few different methods of sewing the arcs to the center piece. I tried pinning and also this method of not pinning. I think the non-pinning method will work better with practice. I also have the curve master foot (which I couldn't find at the time) that essentially is the same as the non-pinning method but with the help of a special foot.
This is the reason some of the corners are off. For this method to work you will need to be accurate in your corners or it will not look right in your finished quilt.
4. You will now trim your block to 9" centering the center fabric (stripes) within the 9" square. You basically have to eyeball this and 9" is enough to give you a 1/4" seam allowance at each of the 4 corners. Here I've added a small border to the block so that you can see that having your corners match will be very important!

As you can see corners 1 and 4 are really nice and perfect. Corner 2 is the worst and corner 3 is decent. I would suggest finding a method that gives you accurate piecing results for step 3 so that your blocks will turn out gorgeous!
Just to give you an idea of what the finished quilt would look like I whipped up these 2 quilt tops through the magic of Photoshop.

Enjoy!
~ Norma
I was really torn between picking the Double Wedding Ring die ($89) and the Rob Peter to Pay Paul die ($89.) In the end the Wedding Ring die won out because I really love that design and I know that some day I want to make a Double Wedding ring quilt and I can't imagine hand cutting all of those tiny pieces. As I was looking at the 2 dies side by side on my computer I had a wild and crazy idea that I could use the double Wedding Ring die to re-create the Rob Peter design!
Even though I recently received the Rob Peter die from Accuquilt I still wanted to test out my theory. So last night I pulled out my Wedding Ring Die and put my theory to the test.


3. Sew the arc pieces to the center section

This is the reason some of the corners are off. For this method to work you will need to be accurate in your corners or it will not look right in your finished quilt.
4. You will now trim your block to 9" centering the center fabric (stripes) within the 9" square. You basically have to eyeball this and 9" is enough to give you a 1/4" seam allowance at each of the 4 corners. Here I've added a small border to the block so that you can see that having your corners match will be very important!
As you can see corners 1 and 4 are really nice and perfect. Corner 2 is the worst and corner 3 is decent. I would suggest finding a method that gives you accurate piecing results for step 3 so that your blocks will turn out gorgeous!
Just to give you an idea of what the finished quilt would look like I whipped up these 2 quilt tops through the magic of Photoshop.
5 blocks x 5 blocks =about 43" square

On point with setting triangles and border
4 blocks x 5 blocks = 50"x 62.5" (plus border)
Enjoy!
~ Norma
Lickety Split (an Accuquilt Go! review, tutorial and giveaway)
Friday, October 1, 2010
No I am NOT giving away a Go! but if you read the entire post you may find it's worth your time!
I know there are lots of Accuquilt Go! giveaways going on all over blog land. I know it may seem impossible to win one when each giveaway has hundreds if not thousands of entries. Well I'm here to tell you Don't. Give. Up. You never know whether you will be the lucky duck as I was a few weeks ago. I'm going to share with you my honest opinion on this little gadget.
I've had my Go! for about 2 weeks now. So far I give it 2 thumbs up! Here is a quick run down of my assessment:
Pros:
- cuts quickly
- cuts accurately
- cuts corners off triangles
- dog ears on some shapes for easy curved piecing
- cuts several layers at once (I've successfully cut 6 layers of quilt shop quality fabric, if you are cutting something thick like flannel you'll won't be able to cut as many layers)
- easy to use
- it's pretty
- practically fool proof
- it's folds up nicely for storage (it takes up a mere 13"x5" of floor space)
Semi-cons:
not really enough of a negative to make me dislike the Go! but things you should be aware of
- weighs 15 lbs (my scale actually said 15.4lbs) Am I the only one who thinks 15 lbs is not light weight? Light weight would be something like 10lbs or less in my mind. My heavy Kenmore sewing machine weighs 20 lbs so if I were taking both to a class or retreat I would make sure I'm not carrying these too far.
- dies can be awkward to store (the longest dies are around 24" in length) If you plan on taking the Go! with you to retreats or classes remember you have to bring the dies too! A cart of some sort would be handy. (Accuquilt makes a rolling tote)
- mats should be stored flat so that they don't warp, making it hard to find a spot for them (the longest one measures 10"x24") and you really don't want to put anything on top because you'll be using it often!
- it takes a bit of muscle to crank the dies through and gets harder with more layers. Maybe my kids are weaklings but my 4 year old can't crank it past the halfway mark and my 6 year old can do it if he uses both hands. Keep this in mind if you are elderly and were hoping this would be super easy. It's kind of like churning Ice cream when it's at that semi-solid state, there's resistance. Every review I have read says it's 'so easy' and 'even my kids could do it.'
- you need a pretty big, clean, stable work surface to use it. I had not seen anywhere the dimensions of the Go! once it is open. Be aware that it's pretty big, not huge but not tiny (about the size of an adult torso when it is closed.) Your space also needs to be flat and clean or the dies might not go through properly. When open the Go! measures 18.5"wide by 30.5"
- there is a small learning curve as with any gadget/notion out on the market. You have to learn how to place fabric to minimize waste, and you have to pay attention to the grain of the fabric(as with rotary cutting.)
- if you happen to mess up a cut you'll end up messing up all the layers (but I haven't messed up yet! I'm sure it's bound to happen sooner or later though.) However I've made mistakes with my rotary cutter before too.
Cons:
- Price, the MSRP is $349.00 and includes 1 die and 1 mat. The value die cuts a 4 1/2" (4" finished) square, a 2 1/2" (2" finished) square, and cuts four 2" finished triangles (Half square triangles.) You can find the Go! for around $200-$250 through various retailers. Please note that all of the Go!s include the free value die and mat. Some retailers make it sound like they are throwing in this extra bonus when it comes packaged that way from Accuquilt.
- Price of the dies. Actually the smaller dies are pretty affordable ($20-$40) through various retailers. It's the larger and more intricate dies that will cost $50-$80. As a manufacturing minor I understand the cost that goes into making a intricate designs and making larger dies and blades. Keep this in mind as you decide whether this gadget will fit in your budget. I have no idea how long the dies will last as I've only had mine for 2 weeks. With proper care I would hoe to get several years of use out of a single die. The trick is to purchase dies that can be used for several other cuts. For example, a strip die can be used to cut strips, squares, and diamonds! There are lots of tutorials popping up showing how to use the dies creatively!
On to the tutorial!
How to cut 100 2.5" squares in the blink of an eye:
{ok I may be exaggerating but I thought it was a catchy title}
You will need:
your Go!
the 2.5" strip die
the 10"x24" mat
a black sharpie
and 1/4 yard of fabric
1) The first thing you need to do, if you haven't already, is to mark your die. You take that sharpie and stick it down into the foam and run it along the blade. This is so you can see where you have to place your fabric. The next mark you want to make is a perpendicular line (the dotted line) at the end of the cutting blades. Do this on both ends of the die. Then make a solid perpendicular line a 1/2" in from the dotted line. Mark this on both ends of the die. This solid line is where you will line up your fabric so that your strips will be cut all the way through the width of the fabric.

2)Next take your pressed fabric and fold it in half selvages together. Just like with rotary cutting you'll get better results if there are no folds or wrinkles in your fabric. Place the fabric on the die. You are going to take your folded edge and line it up along your solid line (the one next to the dotted line)
3) Make sure that all layers of the cut edge of the fabric cover the first blade. This step is like squaring up your fabric using a rotary cutter. If there is one layer that does not cover the entire length of the blade then that strip will not be perfectly straight.


3 strips of fabric 2.5" wide, a slightly narrower strip that can go in your scrap pile, and the only waste are those little strips that you would have wasted with a rotary cutter as well.
5) Now take your first strip (still folded in half and keeping the cut edges lined up) and lay it back on your die with the cut edges lined up against the solid line that is perpendicular to the blades. Make sure that the folded edge of of the strip sits just below the first blade other wise you'll end up with 1 rectangle amongst your squares. Now accordion fold the strip until the entire length fits on the die. As you accordion fold, make sure that the folds of the fabric are either just below the bottom blade and just above the top blade. Repeat with the other 2 strips making sure that you line up the cut edges with the cut edges of the previous strip.
 Carefully place the cutting mat on top of the die and run it back through your Go! Guess what? You can leave the die on the Go! as you are rearranging fabric and then crank it through the other way. It works both ways so you can be even more productive!

again, crank crank crank and you get:
 a nice pile of perfectly squared 2.5" squares and minimal waste or just as much waste as your rotary cutter. I got 48, yes 48! 2.5" squares in about 3 minutes (not including pressing time.) It would have taken me about 10-15 minutes with my rotary cutter and ruler. The really cool thing is that I could have easy fit another 6 strips of fabric on the die and sent them all through at the same time and ended up with 144 2.5" squares in the same amount of time!!! {yes that deserves 3 exclamation marks}
I know that there have been lots of questions as to how to store the dies. I've seen a lot of bloggers using those wire organizers used for pot and pan lids. My problem with those is that I don't have a lot of empty table space to have the dies sitting out on my desk especially for the 24" long dies. So I found this nifty wire basket at the thrift store for $0.75

It's a metal hanging folder organizer and I know I've seen them at office supply stores. I like that I can tuck it in an out of the way corner of the floor. I just make sure that the die stickers are facing out for easy choosing.
Now on to the giveaway!
I'm sorry I'm not giving away a Go! ...but my friend Gene is! Head on over to his blog and leave a comment for a chance to win a Go!
For those of you still reading I have a giveaway of my own. I've been very bad about celebrating blogiversaries, post milestones, and even my new blog. I thought now would be a good time to celebrate
a) 284 posts!!!
b) 2 years of blogging (technically the blog has existed for 3 years but there was a year long gap in there)
c) my new blog
d) the fact that it's starting to cool down in the south!
e) my official business start
f) the fact that I actually won a Go! (still over the moon excited on that one!)
lots of things to celebrate!
So leave me a comment telling me something other than "pick me." What will you celebrate this month? what do you like about Autumn? What are you working on? Something interesting about where you live.
You can have 1 additional entry if you do one of the following: follow my blog (I don't' care if it's in a reader), follow on twitter, or hit "like" on my FB page.
Leave a comment for each entry (maximum 2 per person) and make sure you leave an email if you don't have your blogger profile set to receive emails. If I can't contact you then I will pick someone else.
Comments will remain open until October 15th at midnight. I will pick a winner via RNG on Saturday morning. International entries are welcome!
Oh yeah, what am I giving away? How about 2 highly sought after Out Of Print Heather Ross Lightning Bugs fish FQ's! One lucky winner will get these 2 fun FQ's.

And please remember to come back tomorrow for a fun tutorial on what to do with all those 2.5" squares!
ok Go!
~Norma
PS this post was written before the announcement of the new Go! Baby. Now that I would consider lightweight!
I know there are lots of Accuquilt Go! giveaways going on all over blog land. I know it may seem impossible to win one when each giveaway has hundreds if not thousands of entries. Well I'm here to tell you Don't. Give. Up. You never know whether you will be the lucky duck as I was a few weeks ago. I'm going to share with you my honest opinion on this little gadget.
I've had my Go! for about 2 weeks now. So far I give it 2 thumbs up! Here is a quick run down of my assessment:
Pros:
- cuts quickly
- cuts accurately
- cuts corners off triangles
- dog ears on some shapes for easy curved piecing
- cuts several layers at once (I've successfully cut 6 layers of quilt shop quality fabric, if you are cutting something thick like flannel you'll won't be able to cut as many layers)
- easy to use
- it's pretty
- practically fool proof
- it's folds up nicely for storage (it takes up a mere 13"x5" of floor space)
Semi-cons:
not really enough of a negative to make me dislike the Go! but things you should be aware of
- weighs 15 lbs (my scale actually said 15.4lbs) Am I the only one who thinks 15 lbs is not light weight? Light weight would be something like 10lbs or less in my mind. My heavy Kenmore sewing machine weighs 20 lbs so if I were taking both to a class or retreat I would make sure I'm not carrying these too far.
- dies can be awkward to store (the longest dies are around 24" in length) If you plan on taking the Go! with you to retreats or classes remember you have to bring the dies too! A cart of some sort would be handy. (Accuquilt makes a rolling tote)
- mats should be stored flat so that they don't warp, making it hard to find a spot for them (the longest one measures 10"x24") and you really don't want to put anything on top because you'll be using it often!
- it takes a bit of muscle to crank the dies through and gets harder with more layers. Maybe my kids are weaklings but my 4 year old can't crank it past the halfway mark and my 6 year old can do it if he uses both hands. Keep this in mind if you are elderly and were hoping this would be super easy. It's kind of like churning Ice cream when it's at that semi-solid state, there's resistance. Every review I have read says it's 'so easy' and 'even my kids could do it.'
- you need a pretty big, clean, stable work surface to use it. I had not seen anywhere the dimensions of the Go! once it is open. Be aware that it's pretty big, not huge but not tiny (about the size of an adult torso when it is closed.) Your space also needs to be flat and clean or the dies might not go through properly. When open the Go! measures 18.5"wide by 30.5"
- there is a small learning curve as with any gadget/notion out on the market. You have to learn how to place fabric to minimize waste, and you have to pay attention to the grain of the fabric(as with rotary cutting.)
- if you happen to mess up a cut you'll end up messing up all the layers (but I haven't messed up yet! I'm sure it's bound to happen sooner or later though.) However I've made mistakes with my rotary cutter before too.
Cons:
- Price, the MSRP is $349.00 and includes 1 die and 1 mat. The value die cuts a 4 1/2" (4" finished) square, a 2 1/2" (2" finished) square, and cuts four 2" finished triangles (Half square triangles.) You can find the Go! for around $200-$250 through various retailers. Please note that all of the Go!s include the free value die and mat. Some retailers make it sound like they are throwing in this extra bonus when it comes packaged that way from Accuquilt.
- Price of the dies. Actually the smaller dies are pretty affordable ($20-$40) through various retailers. It's the larger and more intricate dies that will cost $50-$80. As a manufacturing minor I understand the cost that goes into making a intricate designs and making larger dies and blades. Keep this in mind as you decide whether this gadget will fit in your budget. I have no idea how long the dies will last as I've only had mine for 2 weeks. With proper care I would hoe to get several years of use out of a single die. The trick is to purchase dies that can be used for several other cuts. For example, a strip die can be used to cut strips, squares, and diamonds! There are lots of tutorials popping up showing how to use the dies creatively!
On to the tutorial!
How to cut 100 2.5" squares in the blink of an eye:
{ok I may be exaggerating but I thought it was a catchy title}
You will need:
your Go!
the 2.5" strip die
the 10"x24" mat
a black sharpie
and 1/4 yard of fabric
1) The first thing you need to do, if you haven't already, is to mark your die. You take that sharpie and stick it down into the foam and run it along the blade. This is so you can see where you have to place your fabric. The next mark you want to make is a perpendicular line (the dotted line) at the end of the cutting blades. Do this on both ends of the die. Then make a solid perpendicular line a 1/2" in from the dotted line. Mark this on both ends of the die. This solid line is where you will line up your fabric so that your strips will be cut all the way through the width of the fabric.

2)Next take your pressed fabric and fold it in half selvages together. Just like with rotary cutting you'll get better results if there are no folds or wrinkles in your fabric. Place the fabric on the die. You are going to take your folded edge and line it up along your solid line (the one next to the dotted line)
3) Make sure that all layers of the cut edge of the fabric cover the first blade. This step is like squaring up your fabric using a rotary cutter. If there is one layer that does not cover the entire length of the blade then that strip will not be perfectly straight.

4) Now place the die on the Go! Place your cutting mat on top of the fabric being careful not to shift your fabric and run it through your Go!

Crank, crank crank, and you end up with:

3 strips of fabric 2.5" wide, a slightly narrower strip that can go in your scrap pile, and the only waste are those little strips that you would have wasted with a rotary cutter as well.
5) Now take your first strip (still folded in half and keeping the cut edges lined up) and lay it back on your die with the cut edges lined up against the solid line that is perpendicular to the blades. Make sure that the folded edge of of the strip sits just below the first blade other wise you'll end up with 1 rectangle amongst your squares. Now accordion fold the strip until the entire length fits on the die. As you accordion fold, make sure that the folds of the fabric are either just below the bottom blade and just above the top blade. Repeat with the other 2 strips making sure that you line up the cut edges with the cut edges of the previous strip.


again, crank crank crank and you get:

I know that there have been lots of questions as to how to store the dies. I've seen a lot of bloggers using those wire organizers used for pot and pan lids. My problem with those is that I don't have a lot of empty table space to have the dies sitting out on my desk especially for the 24" long dies. So I found this nifty wire basket at the thrift store for $0.75

It's a metal hanging folder organizer and I know I've seen them at office supply stores. I like that I can tuck it in an out of the way corner of the floor. I just make sure that the die stickers are facing out for easy choosing.
Now on to the giveaway!
I'm sorry I'm not giving away a Go! ...but my friend Gene is! Head on over to his blog and leave a comment for a chance to win a Go!
For those of you still reading I have a giveaway of my own. I've been very bad about celebrating blogiversaries, post milestones, and even my new blog. I thought now would be a good time to celebrate
a) 284 posts!!!
b) 2 years of blogging (technically the blog has existed for 3 years but there was a year long gap in there)
c) my new blog
d) the fact that it's starting to cool down in the south!
e) my official business start
f) the fact that I actually won a Go! (still over the moon excited on that one!)
lots of things to celebrate!
So leave me a comment telling me something other than "pick me." What will you celebrate this month? what do you like about Autumn? What are you working on? Something interesting about where you live.
You can have 1 additional entry if you do one of the following: follow my blog (I don't' care if it's in a reader), follow on twitter, or hit "like" on my FB page.
Leave a comment for each entry (maximum 2 per person) and make sure you leave an email if you don't have your blogger profile set to receive emails. If I can't contact you then I will pick someone else.
Comments will remain open until October 15th at midnight. I will pick a winner via RNG on Saturday morning. International entries are welcome!
Oh yeah, what am I giving away? How about 2 highly sought after Out Of Print Heather Ross Lightning Bugs fish FQ's! One lucky winner will get these 2 fun FQ's.

And please remember to come back tomorrow for a fun tutorial on what to do with all those 2.5" squares!
ok Go!
~Norma
PS this post was written before the announcement of the new Go! Baby. Now that I would consider lightweight!
Crafting for Good
Monday, September 20, 2010
The other day my son came home with a reading book from school. The poor book had seen better days and was falling apart despite the tape found on almost every page. I decided to use my crafting powers for good and sent a note to the teacher saying I'd be very happy and willing to repair the book. She sent the book back to me and I used this nifty tutorial on Design Sponge to fix the sad little book.

First I took the book completely apart and squared up the edges of the pages that would be along the binding. Then I pretty much followed the tutorial. Unfortunately I did not have any regular masking tape so I had to use blue painter's tape to cover up the spine once I was done.
Have you used your crafting powers for good lately?
if not, you can bake me some cookies and send them to me. Just sayin'
~Norma

First I took the book completely apart and squared up the edges of the pages that would be along the binding. Then I pretty much followed the tutorial. Unfortunately I did not have any regular masking tape so I had to use blue painter's tape to cover up the spine once I was done.
Have you used your crafting powers for good lately?
if not, you can bake me some cookies and send them to me. Just sayin'
~Norma
My Favorite Free Motion Quilting Tools
Saturday, September 11, 2010
Besides having the basics like a sewing machine with the ability to drop the feed dogs, a free motion foot, a table at the correct height for you and comfy chair, these are the items that I rely on the most for achieving awesome free motion results on a domestic sewing machine.

These are the tools I use every time I sit down to free motion quilt (that plus a seam ripper too.) They are in no particular order and no one tool is more important than the other. Together they create the ideal conditions for my success in free motion quilting. They may or may not work for you, but hopefully one of them will.
Silicone Spray: This stuff is great for slicking up your machine bed and sewing table. I have to warn you though, this is NOT at all like the silicone spray at the hardware store. The stuff I use is from Sprayway and it is a dry spray, won't stain, and doesn't have a smell either. This stuff is used in the garment making industry so yes it is safe for fabrics and for your machine. Don't believe me? Alex and Ricky seem to think it's good stuff. You also have to be careful about over spray on wood floors. No it's not bad for wood, in fact it's a great polisher but it makes those wood floors super slick, especially in socks! It's not expensive at all ($5-$8.) It is kind of hard to find locally but you can buy it online. The bad part is that it has to ship via ground mail so the shipping price is $6-$9!! If you are buying 1 can it won't be worth it but maybe you can get together with your guild or Local Quilt Shop and order a larger quantity to make it worth it. The other down side is that your husband will be stealing it to use it in his workshop!
Sketchbook: Success in free motion quilting will come if you practice practice practice! You don't have to sit down at the machine every time. Sketching your quilting patterns over and over is as useful as doing it with the machine. Doing this will make your patterns second nature and they will just flow when you actually sit at the sewing machine.

Any sketchbook will do as long as you can write on it. I even use the cheap composition books with the Kindergarten writing paper in it. The lines are useful for practicing feathers and loops. Keep it with you so you can sketch when you see a really cool pattern or to practice when you're waiting for something.

Practice Quilt: I've had the same practice quilt for over a year now. As you can see from the picture it is well used. It measures about 20"x20" and it sits by my sewing machine. Anytime I am going to free motion I start on this quilt first. It helps me loosen up and to get into my groove! It also helps me figure out any tension problems before moving on to the actual quilt. I can't tell you how many times I have tried to skip this step and move straight to the main quilt. This is always a huge mistake for me. If I try to skip the practice quilt I will end up with birds nests, tension problems, or uneven stitches.
Foam Stack: Yup, you read that right and it's exactly as stated, a stack of foam! Basically I purchased a sheet of craft foam and cut several pieces about the size of a business card and then glued them together with Elmer's glue. I used seven layers of foam in my stacks. What in the world is this for? Think of it as a Quilter's Mouse (and no you can't take my name!) It is meant to sit just under the palm of your hand just like a computer mouse. The foam is extremely grippy and you don't need much pressure in order to move your quilt around. I like this a lot because my hands feel more relaxed than when I try to quilt with just gloves. It may sound absurd but don't knock it 'til you try it! Sometimes I quilt with a mouse in each hand and other times with one, it just depends on what I'm doing.
Sew Slip: This is a Teflon coated sheet that sticks to your machine or your craft table with out tape or glue. I really like the generous size when compared to other sheets out on the market. I tried both the Supreme Slider and the Sew Slip
Quilting Gloves: Last but not least are my red quilting gloves. Yes they have to be red. The blues and yellows don't work nearly as well as the cute red ones! Really the only thing necessary in quilting gloves are the little white gripper dots on the finger tips and the palms. A pair of gardening gloves would probably work. A pair of footed pajamas would work if you wanted to give it a go at quilting with your feet. I use both my quilting gloves and my Quilter's Mouse together 95% of the time. It just gives me that extra grip I need.
That's what works for me. I'm always open to suggestions though. What free motion tool can you not live without?
~Norma

These are the tools I use every time I sit down to free motion quilt (that plus a seam ripper too.) They are in no particular order and no one tool is more important than the other. Together they create the ideal conditions for my success in free motion quilting. They may or may not work for you, but hopefully one of them will.
- Light
- Silicone Spray
- Sketchbook
- Practice quilt
- Foam stack
- Sew Slip
- Quilting gloves
Silicone Spray: This stuff is great for slicking up your machine bed and sewing table. I have to warn you though, this is NOT at all like the silicone spray at the hardware store. The stuff I use is from Sprayway and it is a dry spray, won't stain, and doesn't have a smell either. This stuff is used in the garment making industry so yes it is safe for fabrics and for your machine. Don't believe me? Alex and Ricky seem to think it's good stuff. You also have to be careful about over spray on wood floors. No it's not bad for wood, in fact it's a great polisher but it makes those wood floors super slick, especially in socks! It's not expensive at all ($5-$8.) It is kind of hard to find locally but you can buy it online. The bad part is that it has to ship via ground mail so the shipping price is $6-$9!! If you are buying 1 can it won't be worth it but maybe you can get together with your guild or Local Quilt Shop and order a larger quantity to make it worth it. The other down side is that your husband will be stealing it to use it in his workshop!
Sketchbook: Success in free motion quilting will come if you practice practice practice! You don't have to sit down at the machine every time. Sketching your quilting patterns over and over is as useful as doing it with the machine. Doing this will make your patterns second nature and they will just flow when you actually sit at the sewing machine.


Practice Quilt: I've had the same practice quilt for over a year now. As you can see from the picture it is well used. It measures about 20"x20" and it sits by my sewing machine. Anytime I am going to free motion I start on this quilt first. It helps me loosen up and to get into my groove! It also helps me figure out any tension problems before moving on to the actual quilt. I can't tell you how many times I have tried to skip this step and move straight to the main quilt. This is always a huge mistake for me. If I try to skip the practice quilt I will end up with birds nests, tension problems, or uneven stitches.
Foam Stack: Yup, you read that right and it's exactly as stated, a stack of foam! Basically I purchased a sheet of craft foam and cut several pieces about the size of a business card and then glued them together with Elmer's glue. I used seven layers of foam in my stacks. What in the world is this for? Think of it as a Quilter's Mouse (and no you can't take my name!) It is meant to sit just under the palm of your hand just like a computer mouse. The foam is extremely grippy and you don't need much pressure in order to move your quilt around. I like this a lot because my hands feel more relaxed than when I try to quilt with just gloves. It may sound absurd but don't knock it 'til you try it! Sometimes I quilt with a mouse in each hand and other times with one, it just depends on what I'm doing.
Sew Slip: This is a Teflon coated sheet that sticks to your machine or your craft table with out tape or glue. I really like the generous size when compared to other sheets out on the market. I tried both the Supreme Slider and the Sew Slip
Quilting Gloves: Last but not least are my red quilting gloves. Yes they have to be red. The blues and yellows don't work nearly as well as the cute red ones! Really the only thing necessary in quilting gloves are the little white gripper dots on the finger tips and the palms. A pair of gardening gloves would probably work. A pair of footed pajamas would work if you wanted to give it a go at quilting with your feet. I use both my quilting gloves and my Quilter's Mouse together 95% of the time. It just gives me that extra grip I need.
That's what works for me. I'm always open to suggestions though. What free motion tool can you not live without?
~Norma
Vintage Goodness : 10 Tips for buying vintage suitcases
Thursday, August 26, 2010
Do you ever look at catalogs or websites and think, "I could do that!" I don't know about you but I sure do! In fact I've got a bookmark list a mile long with "I'm gonna do that someday" inspirations. Every once in a while I actually follow through on those "gonna do" threats.
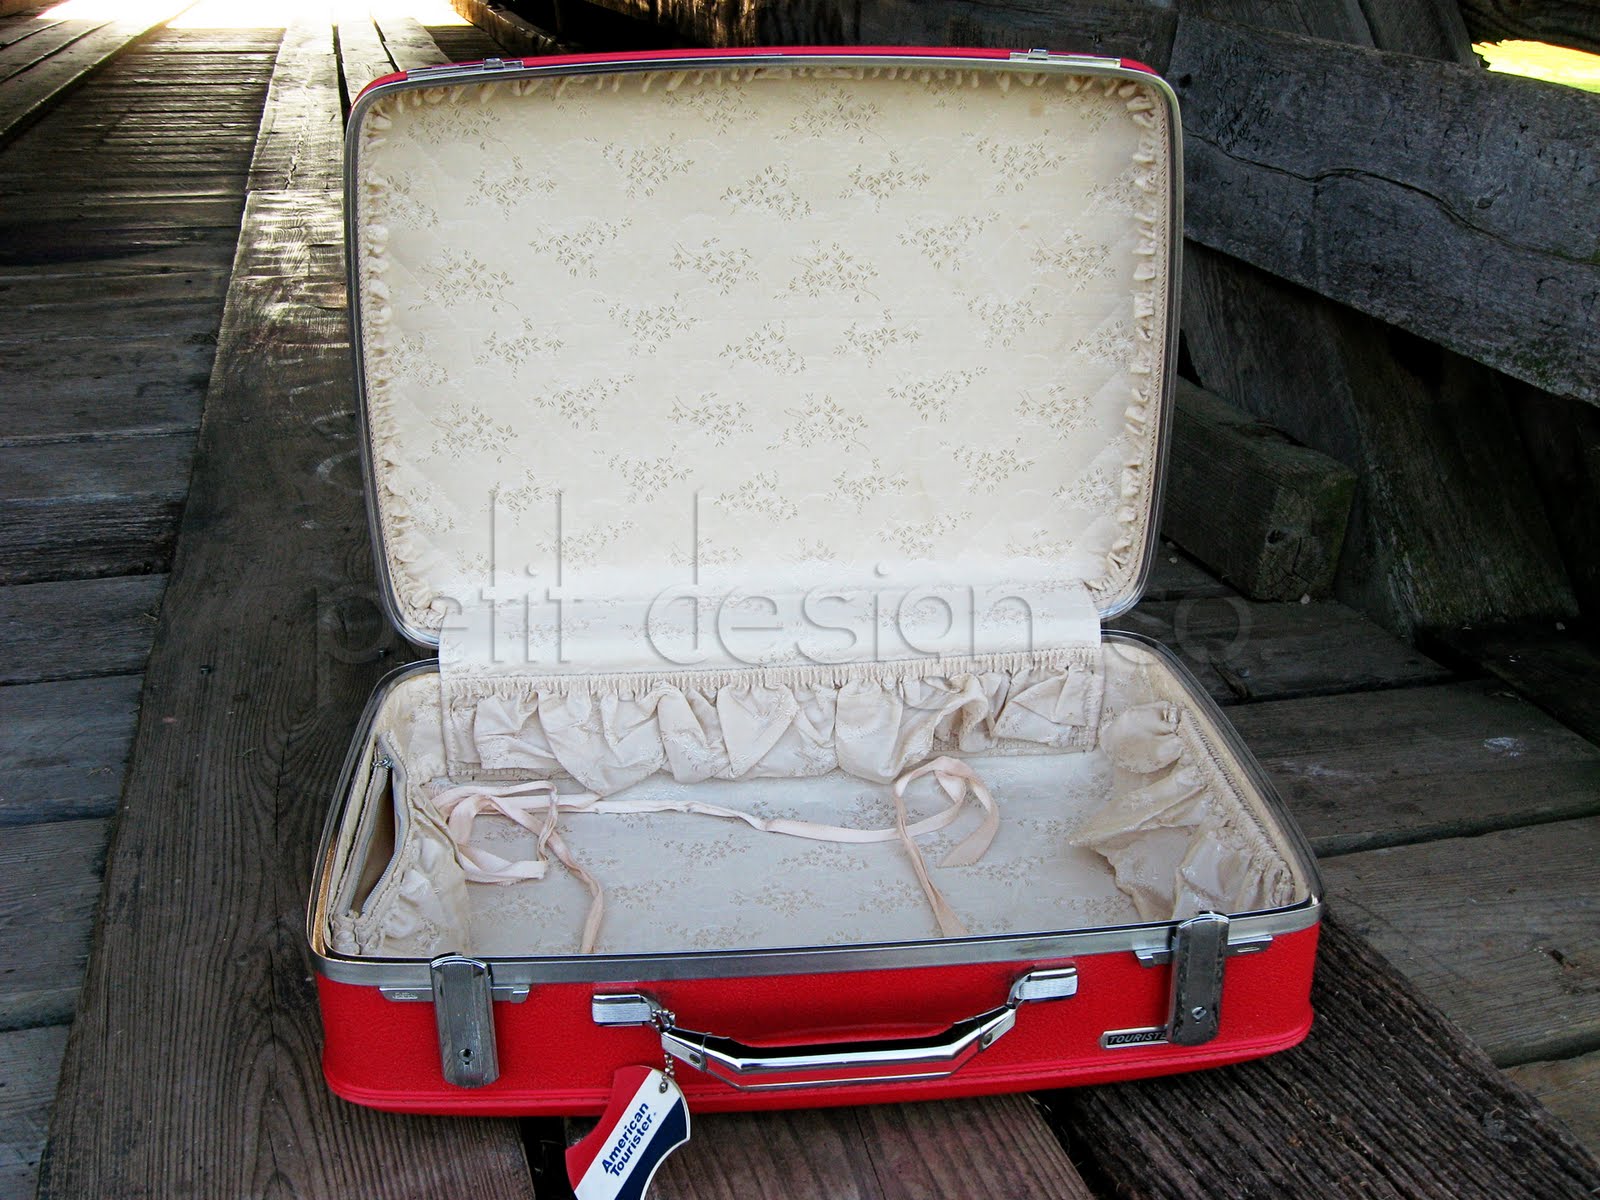
Two weeks ago I was at the thrift store when I spotted the loveliest, in excellent condition RED vintage suitcase. I almost walked away. Actually I was at the end of the isle and I just had to turn around and go back for it. You see I've seen some super awesome upcycled suitcase projects floating around the internet.
This week I tackled the suitcase before it was eaten by the procrastination monster. This is how the lovely vintage American Tourister cleaned up:


This one will be available in the shop(here) sold but trust me, I will not have any issues in keeping this beauty!
Vintage suitcases, especially the smaller hard back ones, are useful for carrying around sewing projects, camera or music equipment, laptops, and of course make super cute carry on luggage. Here are 10 tips to help you in choosing vintage suitcases.
1) Check the outside for cracks and gouges (hard side) or tears (soft side.)
2)Avoid pieces with lots of scuffs. Big black scuffs are hard to get out. White pieces are especially hard to clean!
3) Inspect the latches to make sure they are in proper working order. Open and close them a few times.
 4) Check to see that the suitcase closes properly all the way around.
 5) Search for keys or combination codes. If you can't open the suitcase at the store, chances are you won't be able to open it once you get home.
6)Examine the "feet," often times these are broken, cracked, or have one or two missing.
 7) Look over the outside to see if there are spots where the color has faded. Light fading is common but don't buy one that has prominent fade spots.
8) Open it up and inspect out the interior condition. Make sure zippers work, check for rips, and make sure the lining is still securely attached to the case.
 9)If you can smell it before you even open it don't buy it! Be prepared to get a good whiff once you open the suitcase. Some pieces smell really gross, like cigarettes or who knows what! Most pieces have a slight smell of being cooped up. These can be aired out with an afternoon in the sun and some Febreeze.
10) Check the lining for stains. Light stains can be removed with a soapy rag, a spot carpet cleaner, or try a Tide To Go pen. Large dark stains are going to be nearly impossible to remove unless you're planning on gutting the whole lining, and that is a whole 'nother subject!
So what's on your "I'm gonna do that someday" list?
~Norma
Two weeks ago I was at the thrift store when I spotted the loveliest, in excellent condition RED vintage suitcase. I almost walked away. Actually I was at the end of the isle and I just had to turn around and go back for it. You see I've seen some super awesome upcycled suitcase projects floating around the internet.
This week I tackled the suitcase before it was eaten by the procrastination monster. This is how the lovely vintage American Tourister cleaned up:


This one will be available in the shop
Vintage suitcases, especially the smaller hard back ones, are useful for carrying around sewing projects, camera or music equipment, laptops, and of course make super cute carry on luggage. Here are 10 tips to help you in choosing vintage suitcases.
1) Check the outside for cracks and gouges (hard side) or tears (soft side.)
2)Avoid pieces with lots of scuffs. Big black scuffs are hard to get out. White pieces are especially hard to clean!
3) Inspect the latches to make sure they are in proper working order. Open and close them a few times.


6)Examine the "feet," often times these are broken, cracked, or have one or two missing.

8) Open it up and inspect out the interior condition. Make sure zippers work, check for rips, and make sure the lining is still securely attached to the case.
10) Check the lining for stains. Light stains can be removed with a soapy rag, a spot carpet cleaner, or try a Tide To Go pen. Large dark stains are going to be nearly impossible to remove unless you're planning on gutting the whole lining, and that is a whole 'nother subject!
So what's on your "I'm gonna do that someday" list?
~Norma
Quilt Care
Saturday, August 21, 2010
This is how I take care of my quilts. You may or may not agree and that's ok! This is what works for me and I thought some of you might like to see how I wash my quilts.
First I add a teaspoon {yes just a teaspoon!} of this awesome quilt detergent, "Quilt Care," I found on clearance long ago ($3 clearance, regular $11) to the washer as it is filling up. Quilt Care is phosphate free, bleach free, and it's biodegradable too!

Just a teaspoon does the trick and it bubbles up nicely. I usually cold water for my quilts unless they are really dirty then I use lukewarm water still on the cooler side though.

Once the basin is about half full I add the quilt and make sure it is all submerged. I also add a color catcher cloth to the washing machine at this point. The cloth acts as a magnet for loose dye. At the end of this cycle it had a pink tinge to it from the red fabric prints. Without the color catcher those loose dyes could have redeposited themselves elsewhere on the quilt, like on the backing fabric making the whites look pink instead of white.

I don't have a front loading machine and I don't have a nice laundromat nearby so I just use my top loading machine which happens to have a hand wash setting:

It is a very short cycle with intermittent low agitation and a low spin. It goes something like this: swish swish, pause, swish swish, pause... and it repeats. The pause is like a 15 second pause and the swish is very gentle.
Once the cycle is done I run the quilt through about 15 seconds of a high spin cycle. Then I throw the quilt in the dryer with a clean towel for 10-20 minutes on a low heat setting depending on the size of the quilt. You don't want the quilt to be completely dry but still damp.
Next I lay the quilt out on my bed to finish air drying. At this point you make sure your quilt is lying square as it will retain this shape once it is dry.

That's it! It may seem a little tedious but it is a step I truly enjoy! I love the smell of a fresh clean quilt. This step gives me one last chance to enjoy, pet, smooth, and caress that quilt before it leaves on it's way to it's future home. Taking good care of something you spent hours on truly makes sense to me. I want my quilts to be around long after I'm gone so my great great grand-kids can enjoy them someday.
Do you have any special quilt care tips for me?
~ Norma
First I add a teaspoon {yes just a teaspoon!} of this awesome quilt detergent, "Quilt Care," I found on clearance long ago ($3 clearance, regular $11) to the washer as it is filling up. Quilt Care is phosphate free, bleach free, and it's biodegradable too!

Just a teaspoon does the trick and it bubbles up nicely. I usually cold water for my quilts unless they are really dirty then I use lukewarm water still on the cooler side though.

Once the basin is about half full I add the quilt and make sure it is all submerged. I also add a color catcher cloth to the washing machine at this point. The cloth acts as a magnet for loose dye. At the end of this cycle it had a pink tinge to it from the red fabric prints. Without the color catcher those loose dyes could have redeposited themselves elsewhere on the quilt, like on the backing fabric making the whites look pink instead of white.

I don't have a front loading machine and I don't have a nice laundromat nearby so I just use my top loading machine which happens to have a hand wash setting:

It is a very short cycle with intermittent low agitation and a low spin. It goes something like this: swish swish, pause, swish swish, pause... and it repeats. The pause is like a 15 second pause and the swish is very gentle.
Once the cycle is done I run the quilt through about 15 seconds of a high spin cycle. Then I throw the quilt in the dryer with a clean towel for 10-20 minutes on a low heat setting depending on the size of the quilt. You don't want the quilt to be completely dry but still damp.
Next I lay the quilt out on my bed to finish air drying. At this point you make sure your quilt is lying square as it will retain this shape once it is dry.

That's it! It may seem a little tedious but it is a step I truly enjoy! I love the smell of a fresh clean quilt. This step gives me one last chance to enjoy, pet, smooth, and caress that quilt before it leaves on it's way to it's future home. Taking good care of something you spent hours on truly makes sense to me. I want my quilts to be around long after I'm gone so my great great grand-kids can enjoy them someday.
Do you have any special quilt care tips for me?
~ Norma
Cutest Swiffer on the Block
Thursday, July 1, 2010
A while ago (at least a month or two ago) I ran across this ingenious tutorial on Sew Much Ado which resulted in this overly cute Swiffer duster:


I've made 2 and have plans to make more because yes, they are easy to make, yes they work, and yes, they're cute. Plus I don't feel bad since I don't have to throw away one of the store bought replacements every few days since I can throw these in the wash. One word of caution, don't wash these in the same load as anything microfiber. I found out the hard way that said microfiber item will attract every bit of loose thread.

Basting Tutorial
Thursday, June 10, 2010
It seems like everyone has their own method of basting quilts together. I've tried lots of different ways and finally settled on this method which works for me and might work for you.
First I lay down my backing on a nice clean floor (this method will not work on carpet.) Then I tape down newspaper all along the outer edges. I use plain old blue painters tape. Then I "stretch" out and tape down my backing to the newspaper. I use the word "stretch" for lack of a better word. You want the quilt back nice and taught but you don't want to over stretch it or distort it.
Notice my diagonal pieced backing! I've been using John Flynn's method for a few years and I love it. It may be a little confusing at first but it is definitely worth learning to do it to save money on backings. Read more here and here.
First I lay down my backing on a nice clean floor (this method will not work on carpet.) Then I tape down newspaper all along the outer edges. I use plain old blue painters tape. Then I "stretch" out and tape down my backing to the newspaper. I use the word "stretch" for lack of a better word. You want the quilt back nice and taught but you don't want to over stretch it or distort it.
Notice my diagonal pieced backing! I've been using John Flynn's method for a few years and I love it. It may be a little confusing at first but it is definitely worth learning to do it to save money on backings. Read more here and here.


I have been using spray basting by June Tailor and have used up one whole can of it and I have one can left. I was able to do several 45x45 quilts with the can as well as several doll quilt sized mini quilts. It is rather expensive at around $9/can but I got mine on clearance long ago for about $4. I don't know if I will buy more of it or try a different brand. I've heard lots of good things about using Aquanet hairspray at around $2/can I'll definitely give that a try! Maybe I can find some coupons to get it for free!
Subscribe to:
Posts
(
Atom
)


 Posts
Posts

