I’ve come to the conclusion (again) that I’m not the greatest at blogging. Blogging seems to be a seasonal thing for me. I don’t know what it is (call it life) but sometimes I just have too much going on. I’ve decided that I am no longer going to apologize for my lack of blogging (you’re probably tired of
those posts anyway.) I have plenty to share just not enough time or energy to do so.
So what’s been going on in the Petit Design household? Well my little chubster is going to be 7 months old tomorrow. 7 months! *w*o*w* …umm yeah, I’ve been slacking on the picture taking too.
I’m living in 2 states. What? Yeah, it’s a long story. I’m living in TN and AL while we figure out what to do with our house in TN. ( Anyone want to buy a house in Middle TN?) It’s sooo much fun to travel back and forth every couple of weeks with 3 kids and 2 dogs. *insert sarcastic tone* BUT I am so grateful that since we are
debt free it is not a huge burden as long as it doesn’t go on forever.
I’m now homeschooling my 2nd grader and Kindergartner. Traveling back and forth between 2 states is not conducive to regular schooling. Technically my kids are participating in Online Public School. It’s like home schooling but it’s free! The state sends you all the materials and the lessons are all laid out for you so you don’t even have to think about it!
I haven’t done too much quilting lately. Rather I’ve done a bit of remodeling/updating to the TN house. I finally got around to doing something that I have wanted to do since the very first day we looked at the house.
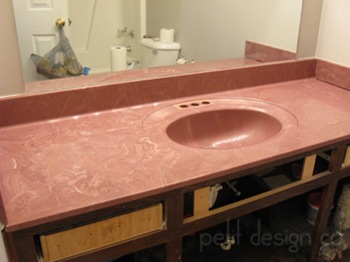
Both of the bathrooms were sporting these lovely lavender pink sinks. These are actually nice molded sinks if not for the color. They might even be cultured marble. The color just wasn’t cutting it for me though.
So I painted the sinks with a one part epoxy paint called “Tub and Tile.” It’s very smelly, took 3 coats of paint and several days of painting and drying. The box touts this product as “tough as tile.” One bathroom sink is doing great. The other… well let’s just say you shouldn’t take a screw driver to the sink.
While we took out the faucet so that I could paint, hubby didn’t remove the drain cover thingy. It wasn’t a big deal because I carefully taped around the drain and it turned out great. Fast forward to installing the new faucet. It came with a matching (satin nickel) drain guard thingy. Hubby decided to change them out (after I had painted the sinks.) Well one was easy as pie to change out, the other one was so tough that hubby was using all his strength and a screw driver to try and get it out. Well he lost the battle and only ended up scratching the epoxy paint off. There went all of my hard work! I have yet to fix it.
Here is a picture of the painted sink during the process. I think this was after the first coat of paint. This is also the sink I have to re-do.
I’ll post an updated picture once I get the new hardware. We also painted the cabinets on off white. The bathrooms look so much brighter and nicer with the purple sinks gone. Oh and it was a $36 dollars for the epoxy paint.
We also updated some of the paint colors in the kitchen. First I re-painted the counter tops with rustoleum counter top paint, not to be confused with their new expensive counter top kit. For about $20 I got a taupe-y gray color. I followed all the directions and let them cure for over a week. I’m pleased with the color but I can’t say much for the wear. There are already a few nicks on the counter tops and I’ve been super gentle with them. They wore so much better when I painted them with regular oil based paint years ago.
We also changed the wall color from yellow to a really pretty blue teal. I love it against the black cabinets and white trim. Add a few splashes of the color of the year (tangerine) and I'll have a very “in” kitchen.
Here’s a picture of what the kitchen looked like the last time I got the remodeling bug.
In case you're wondering what the kitchen looked like when we first bought the house 5 years ago:
~ Norma


